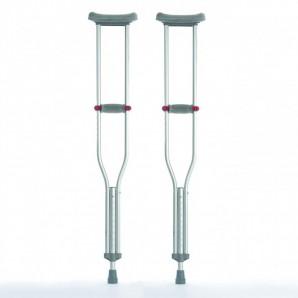
If you are recovering from an injury or have a condition which means you need to use crutches, it is vital that know the correct techniques involved. Misuse can lead to accidents or secondary injuries. While using aids like walking sticks is intuitive, crutches require more thought.
Underarm crutches seem simple designs, but care is necessary when using them. These models have a horizontal bar at the top which fits under the armpit. Two vertical tubes meet at the bottom, were a single shaft makes contact with the floor. At the height of your upper thigh, there is second horizontal bar, one which the hands rest.
People use single crutches in the same way as walking sticks. Usually this is by employing the crutch on the opposite side of the body to the injured leg. If you are using a pair of crutches, you may need to think about how to use them correctly depending on the nature of your injury.
Crutch Height
The first thing to consider is the height of the crutches. Adjust them using the ‘button-clip’ in the single vertical shaft in the bottom sections. It allows setting of the length as desired. To select the correct size for you, the horizontal pad which fits under the armpit should have around two inches of clearance above it.
In other words, this pad should not fit tight against the armpit. If it is set to high, it applies pressure to nerves under the arm, which can cause pain and secondary injury. A good way to test if the crutches are the correct length, is to make sure you can get two fingers into the gap between your armpit and the horizontal pad. Once fitting correctly, one’s arms should bend slightly at the elbow.
Do not hold the crutches too close to the body. Instead, angle them slightly outwards, so there are a few inches between the outside of your foot and foot of each crutch.
Depending on the nature of the injury, different techniques might be necessary. There are two general categories: partial weight bearing and non-weight bearing.
Partial Weight Bearing Situations
If your injured leg is able to take some weight, move the crutches forward by a step length, then move your bad leg forward. Lastly, bring your uninjured leg forward.
To climb steps or stairs, place your toes an inch or two away from the first step. Place your balance on the two crutches before stepping up with your good leg. Then bring the injured leg and crutches up to join it. Repeat this for each step.
When going downstairs, bring the crutches down to the lower step so your weight is going through them, followed by your bad leg. Lastly, bring your uninjured leg down to join it.
Non Weight Bearing Situations
For people whose injury means they can’t put any weight on one of their feet, there is a different technique. Use small steps, don’t over-reach going forward. Ensure the body weight goes through the hands and forearms, and avoid resting on the armpit pads.
To move forwards, all one’s body weight should be on the good leg, before moving both crutches forward by one step length. Then transfer your body-weight onto the arms and the crutches, before moving both legs forward together. This prevents any pressure on the injured limb.
To climb stairs, move your feet close to the first step. Slightly bend the injured leg so that your toes don’t trip on the step. Shift your body weight towards the step and step forward onto the first step with your good leg. Straighten this leg and in the same motion bring both crutches up so that they are level with it on the step.
When going downstairs, hold the injured leg out in front of the other by a few inches. Then bend forward and put the feet of both crutches on the step below. Once balanced, step down with the good leg. Repeat this process for each downward step.


No Comments